서론
약 2-3년 전 Terraform을 배운 적이 있지만, 이후에 사용한 적이 없어 Terraform에 대해 다시 학습했다.
이번에는 기본적인 사용법 및 내용을 적어두어 나중에 필요할 때 꺼내보기 위해 기록한다.
Terraform Up&Runnig 책을 참고하고자 했으나,
테라폼으로 시작하는 IaC가 ebook으로 쉽게 참고할 수 있어 대체했다.
Terrafrom
Workflow
- terraform init
- 환경 준비
- 테라폼 구성 파일이 있는 작업 디렉터리를 초기화
- terraform plan
- 파일 검토
- 인프라의 변경 사항에 관한 실행 계획을 생성하는 동
- terraform apply
- 실행
- 계획을 기반으로 작업을 실행
- terraform destroy
- 테라폼 구성에서 관리하는 모든 개체를 제거하는 명령
- terraform validate
- 테라폼 구성 파일의 유효성을 확인
- 코드적인 유효성만 검사
- terraform fmt
- format의 줄임 표기
- 스타일의 차이로 생긴 코드 중복 처리 가능
File

Block
리소스(Resource)
resource "<리소스 유형>" "<이름>"{
	<인수> = <값>
}

# 리소스 참조
<리소스 유형>.<이름>.<인수>
<리소스 유형>.<이름>.<속성>
Ex.
resource "local_file" "abc"{
	content = "123!"
	filename = "${path.module}/abc.txt"
}
출력 결과
PS C:\workspace\terraform> terraform init
Initializing the backend...
Initializing provider plugins...
- Finding latest version of hashicorp/local...
- Installing hashicorp/local v2.6.1...
- Installed hashicorp/local v2.6.1 (signed by HashiCorp)
Terraform has created a lock file .terraform.lock.hcl to record the provider
selections it made above. Include this file in your version control repository
so that Terraform can guarantee to make the same selections by default when
you run "terraform init" in the future.

Terraform has been successfully initialized!

You may now begin working with Terraform. Try running "terraform plan" to see
any changes that are required for your infrastructure. All Terraform commands
should now work.

If you ever set or change modules or backend configuration for Terraform,
rerun this command to reinitialize your working directory. If you forget, other
commands will detect it and remind you to do so if necessary.


PS C:\workspace\terraform> terraform plan

Terraform used the selected providers to generate the following execution plan. Resource actions are indicated with the following
symbols:
  + create

Terraform will perform the following actions:

  # local_file.abc will be created
  + resource "local_file" "abc" {
      + content              = "abc!"
      + content_base64sha256 = (known after apply)
      + content_base64sha512 = (known after apply)
      + content_md5          = (known after apply)
      + content_sha1         = (known after apply)
      + content_sha256       = (known after apply)
      + content_sha512       = (known after apply)
      + directory_permission = "0777"
      + file_permission      = "0777"
      + filename             = "./abc.txt"
      + id                   = (known after apply)
roy.

─────────────────────────────────────────────────────────────────────────────────────────────────────────────────────────────────────

Note: You didn't use the -out option to save this plan, so Terraform can't guarantee to take exactly these actions if you run
"terraform apply" now.


PS C:\workspace\terraform> terraform apply

Terraform used the selected providers to generate the
following execution plan. Resource actions are indicated with
the following symbols:
  + create

Terraform will perform the following actions:

  # local_file.abc will be created
  + resource "local_file" "abc" {
      + content              = "abc!"
      + content_base64sha256 = (known after apply)
      + content_base64sha512 = (known after apply)
      + content_md5          = (known after apply)
      + content_sha1         = (known after apply)
      + content_sha256       = (known after apply)
      + content_sha512       = (known after apply)
      + directory_permission = "0777"
      + file_permission      = "0777"
      + filename             = "./abc.txt"
      + id                   = (known after apply)
    }

Plan: 1 to add, 0 to change, 0 to destroy.

Do you want to perform these actions?
  Terraform will perform the actions described above.
  Only 'yes' will be accepted to approve.

  Enter a value: yes

local_file.abc: Creating...
local_file.abc: Creation complete after 0s [id=...]

Apply complete! Resources: 1 added, 0 changed, 0 destroyed.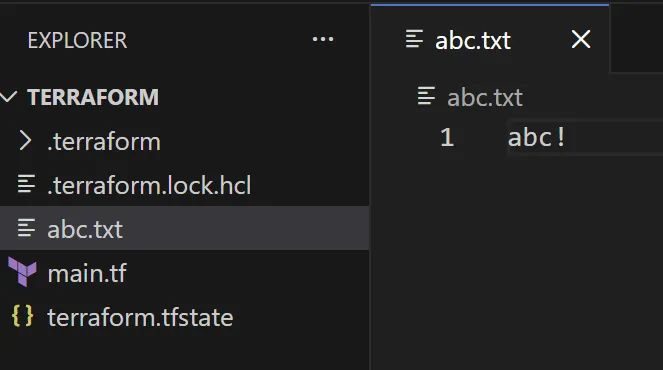
참고로, destroy 실행 결과도 남겨두겠다.
PS C:\workspace\terraform> terraform destroy
local_file.abc: Refreshing state... [id=...]

Terraform used the selected providers to generate the following execution plan. Resource actions are indicated with the following symbols:
  - destroy

Terraform will perform the following actions:

  # local_file.abc will be destroyed
  - resource "local_file" "abc" {
      - content              = "abc!" -> null
      - content_base64sha256 = "..." -> null
      - content_base64sha512 = "..." -> null
      - content_md5          = "..." -> null
      - content_sha1         = "..." -> null
      - content_sha256       = "..." -> null
      - content_sha512       = "..." -> null
      - directory_permission = "0777" -> null
      - file_permission      = "0777" -> null
      - filename             = "./abc.txt" -> null
      - id                   = "..." -> null
    }

Plan: 0 to add, 0 to change, 1 to destroy.

Do you really want to destroy all resources?
  Terraform will destroy all your managed infrastructure, as shown above.
  There is no undo. Only 'yes' will be accepted to confirm.

  Enter a value: yes

local_file.abc: Destroying... [id=...]
local_file.abc: Destruction complete after 0s

Destroy complete! Resources: 1 destroyed.
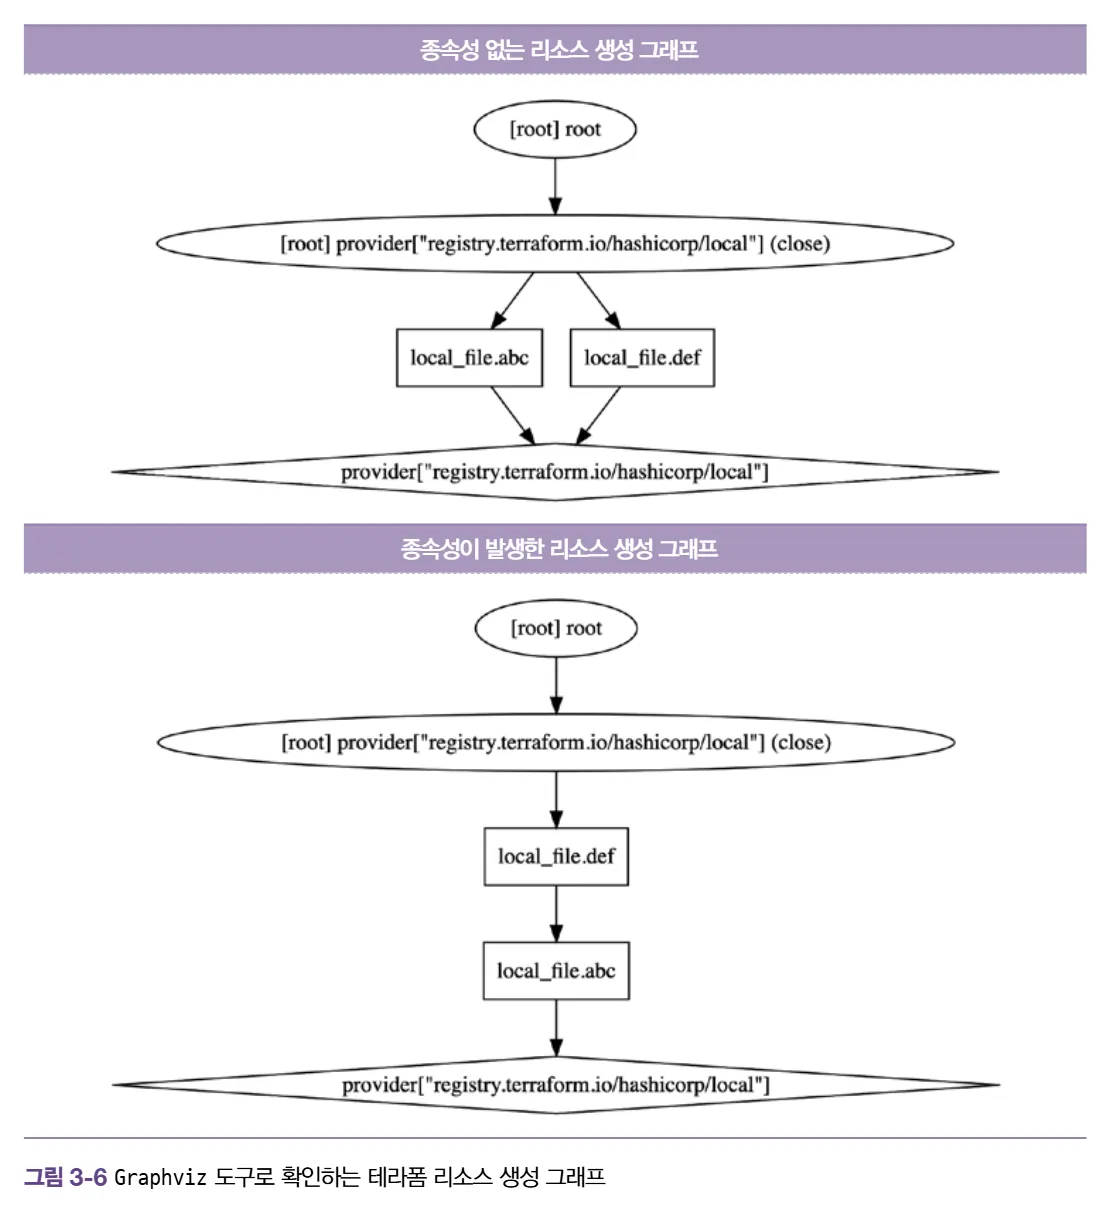
종속성
Terraform은 코드에서 reference 관계를 보고 순서를 알아서 결정할 수 있다. 하지만 Terraform이 자동으로 파악하지 못하는 숨겨진 의존성이 있을 때는 수동으로 개입할 수 있다.
resource "local_file" "abc"{
	content = "123!"
	filename = "${path.module}/abc.txt"
}

resource "loacl_file" "def"{
	depends_on = [
		local_file.abc
	]

	content = "456!"
	filename = "${path.module}/def.txt"
}
수명 주기
- create_before_destroy(bool): 신규 리소스 생성 후 기존 리소스 삭제
- prevent_destroy(bool): 리소스를 삭제하려 할 때 명시적으로 거부
- ignore_changes(list): 리소스 요소에 선언된 인수의 변경 사항을 테라폼 실행 시 무시
resource "local_file" "abc" {
	content = "lifecycle - step 1"
	filename = "${path.module}/abc.txt"

	lifecycle {
		create_before_destroy = false
		ignore_changes = [
			content
		]
	}
}- precondition: 리소스 요소에 선언된 인수의 조건을 검증
- 리소스 생성/수정 전
- 입력 값이나 외부 의존성 검증
- 실패 시 해당 리소스 작업을 아예 시작 X
resource "aws_instance" "example" {
  ami           = var.ami_id
  instance_type = "t2.micro"

  lifecycle {
    precondition {
      # 예: T2 나노 인스턴스는 성능 문제로 사용 금지
      condition     = var.instance_type != "t2.nano"
      error_message = "t2.nano 인스턴스는 우리 회사의 성능 기준에 미달합니다."
    }
  }
}- postcondition: plan과 apply 이후의 결과를 속성 값으로 검증
- 리소스 생성/수정 후
- 생성 결과 및 보안 정책 준수 보장
- 실패 시 해당 리소스는 생성될 수 있으나, 후속 작업 중단
resource "aws_instance" "example" {
  # ... (생략)

  lifecycle {
    postcondition {
      # 예: 생성된 인스턴스가 반드시 퍼블릭 IP를 가져야 함
      condition     = self.public_ip != ""
      error_message = "서버에 퍼블릭 IP가 할당되지 않았습니다. 네트워크 설정을 확인하세요."
    }
  }
}
데이터 소스(Data)
data "<리소스 유형>" "<이름>"{
	<인수> = <값>
}

# 데이터 소스 참조
data.<리소스 유형>.<이름>.<속성>
Ex.
data "local_file" "abc" {
	filename = "${path.module}/abc.txt"
}
Resource와 Data 차이
아래 예시를 보고 문득 Resource와 Data가 헷갈렸다.
resource "local_file" "abc" {
	content = "123!"
	filename = "${path.module}/abc.txt"
}

data "local_file" "abc" {
	filename = local_file.abc.filename
}

resource "local_file" "def" {
	content = data.local_file.abc.content
	filename = "${path.module}/def.txt"
}
정리하자면, Resource는 데이터를 생성하는 역할을 하고 Data는 데이터를 읽어오는 역할을 한다.
| 구분 | 리소스 (resource) | 데이터 소스 (data) |
| 핵심 역할 | 생성 및 관리 (Create/Manage) | 정보 읽기 (Read/Fetch) |
| 액션 | 인프라를 직접 만들고, 수정하고, 삭제함 | 이미 있는 인프라의 정보를 조회만 함 |
그렇기 때문에 데이터 소스 블록 안에 들어가는 인수들은 대부분 필터의 역할을 한다.
입력 변수
variable "<이름>" {
	<인수> = <값>
}

variable "image_id" {
	type = string
}
Ex.
resource "local_file" "maybe" {
	count = var.file_create ? 1 : 0
	content = var.content
	filename = "maybe.txt"
}

variable "file_create" {
	type = bool
	default = true
}

variable "content" {
	description = "파일이 생성되는 경우에 내용이 비어있는지 확인합니다."
	type = string

	validation {
		condition = var.file_create == true ? length(var.content) > 0 : true
		error_message = "파일 내용이 비어있을 수 없습니다."
	}
}- 리소스 정의: local_file
- var.file_create가 true면 1개 생성, 아니면 0개
- 조건 변수: file_create
- 파일을 만들지 말지 결정하는 스위치 역할
- 검증 로직이 포함된 변수: content
- var.file_create가 ture이면 파일이 생성될 것이고 이때 길이가 0보다 크다면 true, 아니면 false이다. 파일을 만들지 않았다면 true이다.
- condition이 fale인 경우 error_message가 출력된다.
실행 결과
PS C:\workspace\terraform> terraform plan
var.content
  파일이 생성되는 경우에 내용이 비어있는지 확인합니다.

  Enter a value:


Planning failed. Terraform encountered an error while generating this plan.

╷
│ Error: Invalid value for variable
│
│   on main.tf line 12:
│   12: variable "content" {
│     ├────────────────
│     │ var.content is ""
│     │ var.file_create is true
│
│ 파일 내용이 비어있을 수 없습니다.
│
│ This was checked by the validation rule at main.tf:16,2-12.
문법
반복문
count
variable "names" {
	type = list(string)
	default = ["a", "b", "c"]
}

resource "local_file" "abc" {
	count = length(var.names)
	content = "abc"
	filename = "${path.module}/abc-${var.names[count.index]}.txt"
}

resource "local_file" "def" {
	count = length(var.names)
	content = local_file.abc[count.index].content
	filename = "${path.module}/def-${element(var.names, count.index)}.txt"
}}| 리소스 정의 | 생성되는 파일 목록 | 파일 내용 |
| local_file.abc | abc-a.txt, abc-b.txt, abc-c.txt | "abc" |
| local_file.def | def-a.txt, def-b.txt, def-c.txt | "abc" |
for_each
resource "loacl_file" "abc" {
	for_each = {
		a = "content a"
		b = "content b"
	}

	content = each.value
	filename = "${path.module}/${each.key}.txt"
}
for
variable "names" {
	type = list(string)
	default = ["a", "b"]
}

output "A_upper_value" {
	value = [for v in var.names: upper(v)]
}

output "B_index_and_value" {
	value = [for i, v in var.names: "${i} is ${v}"]
}

output "C_make_object" {
	value = {for v in var.names: v => upper(v)}
}

output "D_with_filter" {
	value = [for v in var.names: upper(v) if v != "a"]
}
dynamic
variable "names" {
	default = {
		a = "hello a"
		b = "hello b"
		c = "hello c"
	}
}

data "archive_file" "dotfiles" {
	type = "zip"
	output_path = "${path.module}/dotfiles.zip"

	dynamic "source" {
		for_each = var.names
		content {
			content = source.value
			filename = "${path.module}/${source.key}.txt"
		}
	}
}
정리
| 구분 | 도구 | 사용 경우 | 결과물 |
| 리소스 반복 | count | 리소스를 여러 개 만들 때 (숫자 기반) | 리소스 뭉치 (List) |
| 리소스 반복 | for_each | 리소스를 여러 개 만들 때 (키 기반) | 리소스 뭉치 (Map) |
| 데이터 변환 | for | 데이터를 가공하거나 필터링할 때 | 새로운 List 또는 Map |
| 내부 블록 반복 | dynamic | 리소스 '내부'의 설정을 동적으로 반복할 때 | 1개 리소스 내 여러 설정 |
조건식
# <조건 정의> ? <옳은 경우> : <틀린 경우>
var.a != "" ? var.a : "default-a"
프로바이더
Terraform이 어떤 플랫폼(AWS, Azure, GCP, Kubernetes 등)과 대화할지 결정하는 플러그인
프로바이더를 통해 API를 호출하고 리소스를 생성
State
코드와 실제 리소스 사이를 연결해주는 연결 고리
장부와 같은 역할
역할
- 매핑
- State에는 테라폼 구성과 실제를 동기화하고 각 리소스에 고유한 아이디(리소스 주소)로 맵핑
- 코드에 지은 이름과 ID 값은 서로 다르기에 이 둘을 연결해주는 기록을 State 파일에 합니다.
- my_web_server와 i-0abcd1234
- 메타데이터 저장
- 리소스 종속성과 같은 메타 데이터를 저장하고 추적
- 리소스 간의 의존성 정보를 담고 있어, 삭제하거나 수정할 때 어떤 순서로 작업해야 할지 결정
- 성능 향상
- 테라폼 구성으로 프로비저닝된 결과를 캐싱하는 역할을 수행
- State 파일을 보고 현재 상태를 파악한 뒤, 필요한 부분만 실제 인프라와 대조

워크스페이스
State를 관리하는 논리적인 가상 공간

terraform workspace list # 목록 확인
terraform workspace new myworkspace1 # 워크스페이스 생성
terraform workspace select myworkspace1 # 워크스페이스 전환
terraform workspace show # 현재 사용 중인 워크스페이스
모듈
테라폼 구성의 집합
- 루트 모듈: 테라폼을 실행하고 프로비저닝하는 최상위 모듈
- 자식 모듈: 루트 모듈의 구성에서 호출되는 외부 구성 집합
기본 실습
자식 모듈
main.tf
resource "random_pet" "name" {
  keepers = {
	ami_id = timestamp()
  }
}

resource "random_password" "password" {
  length = var.isDB ? 16: 10
  special = var.isDB ? true : false
  override_special = "!#$%*?"
}
variable.tf
variable "isDB" {
  type = bool
  default = false
  description = "패스워드 대상의 DB 여부"
}
output.tf
output "id" {
  value = random_pet.name.id
}

output "pw" {
  value = nonsensitive(random_password.password.result)
}
결과
PS C:\workspace\terraform\modules> terraform apply -auto-approve -var=isDB=true

Terraform used the selected providers to generate the following execution plan. Resource
actions are indicated with the following symbols:
  + create

Terraform will perform the following actions:

  # random_password.password will be created
  + resource "random_password" "password" {
      + bcrypt_hash      = (sensitive value)
      + id               = (known after apply)
      + length           = 16
      + lower            = true
      + min_lower        = 0
      + min_numeric      = 0
      + min_special      = 0
      + min_upper        = 0
      + number           = true
      + numeric          = true
      + override_special = "!#$%*?"
      + result           = (sensitive value)
      + special          = true
      + upper            = true
    }

  # random_pet.name will be created
  + resource "random_pet" "name" {
      + id        = (known after apply)
      + keepers   = {
          + "ami_id" = (known after apply)
        }
      + length    = 2
      + separator = "-"
    }

Plan: 2 to add, 0 to change, 0 to destroy.

Changes to Outputs:
  + id = (known after apply)
  + pw = (known after apply)
random_pet.name: Creating...
random_password.password: Creating...
random_pet.name: Creation complete after 0s [id=knowing-weevil]
random_password.password: Creation complete after 1s [id=none]

Apply complete! Resources: 2 added, 0 changed, 0 destroyed.

Outputs:

id = "knowing-weevil"
pw = "2vyIQOTPGoxtNmYO"
루트 모듈
main.tf
module "mypw1" {
  source = "./modules"
}

module "mypw2" {
  source = "./modules"
  isDB =  true
}

output "mypw1" {
  value = module.mypw1
}

output "mypw2" {
  value = module.mypw2
}
결과
PS C:\workspace\terraform> terraform apply -auto-approve

Terraform used the selected providers to generate the following
execution plan. Resource actions are indicated with the
following symbols:
  + create

Terraform will perform the following actions:

  # module.mypw1.random_password.password will be created
  + resource "random_password" "password" {
      + bcrypt_hash      = (sensitive value)
      + id               = (known after apply)
      + length           = 10
      + lower            = true
      + min_lower        = 0
      + min_numeric      = 0
      + min_special      = 0
      + min_upper        = 0
      + number           = true
      + numeric          = true
      + override_special = "!#$%*?"
      + result           = (sensitive value)
      + special          = false
      + upper            = true
    }

  # module.mypw1.random_pet.name will be created
  + resource "random_pet" "name" {
      + id        = (known after apply)
      + keepers   = {
          + "ami_id" = (known after apply)
        }
      + length    = 2
      + separator = "-"
    }

  # module.mypw2.random_password.password will be created
  + resource "random_password" "password" {
      + bcrypt_hash      = (sensitive value)
      + id               = (known after apply)
      + length           = 16
      + lower            = true
      + min_lower        = 0
      + min_numeric      = 0
      + min_special      = 0
      + min_upper        = 0
      + number           = true
      + numeric          = true
      + override_special = "!#$%*?"
      + result           = (sensitive value)
      + special          = true
      + upper            = true
    }

  # module.mypw2.random_pet.name will be created
  + resource "random_pet" "name" {
      + id        = (known after apply)
      + keepers   = {
          + "ami_id" = (known after apply)
        }
      + length    = 2
      + separator = "-"
    }

Plan: 4 to add, 0 to change, 0 to destroy.

Changes to Outputs:
  + mypw1 = {
      + id = (known after apply)
      + pw = (known after apply)
    }
  + mypw2 = {
      + id = (known after apply)
      + pw = (known after apply)
    }
module.mypw1.random_pet.name: Creating...
module.mypw2.random_pet.name: Creating...
module.mypw2.random_password.password: Creating...
module.mypw1.random_pet.name: Creation complete after 0s [id=normal-midge]
module.mypw2.random_pet.name: Creation complete after 0s [id=concise-seagull]
module.mypw1.random_password.password: Creating...
module.mypw1.random_password.password: Creation complete after 0s [id=none]
module.mypw2.random_password.password: Creation complete after 0s [id=none]

Apply complete! Resources: 4 added, 0 changed, 0 destroyed.

Outputs:

mypw1 = {
  "id" = "normal-midge"
  "pw" = "wbts1vCMiI"
}
mypw2 = {
  "id" = "concise-seagull"
  "pw" = "R52*3N8ykaKYZWsK"
}
심화 실습
루트 모듈
main.tf
provider "aws" {
  region = "us-west-1"
}

provider "aws" {
  alias = "seoul"
  region = "ap-northeast-2"
}

module "ec2_california" {
  source = "./modules"
}

module "ec2_seoul" {
  source = "./modules"
  providers = {
    aws = aws.seoul
  }
  instance_type = "m5.large"
}- 기본 프로바이더 값은 미국, 별칭으로 서울 지정
- 모듈 호출
- 인스턴스 생성
- 모듈 안의 aws를 서울 리전으로 교체하고 사양을 m5.large로 변경
output.tf
output "module_output_california"{
    value = module.ec2_california.private_ip
}

output "module_output_seoul" {
  value = module.ec2_seoul.private_ip
}
자식 모듈
main.tf
terraform {
  required_providers {
    aws = {
        source = "hashicorp/aws"
    }
  }
}

resource "aws_default_vpc" "default" {} # 기본 VPC가 있는지 확인

data "aws_ami" "default" {
  most_recent = true
  owners = ["amazon"]

  filter {
    name = "owner-alias"
    values = ["amazon"]
  }

  filter {
    name = "name"
    values = ["amzn2-ami-hvm*"]
  }
}

resource "aws_instance" "default" {
  depends_on = [ aws_default_vpc.default ]
  ami = data.aws_ami.default.id
  instance_type = var.instance_type

  tags = {
    Name = var.instance_name
  }
}- 이 모듈이 작동하려면 AWS 프로바이더가 반드시 필요하다는 것을 명시
- data: 각 리전마다 AMI ID가 다르기 때문에 직접 숫자를 적지 않고 리전별 최신 정보를 실시간으로 조회
- 필터를 통해 Amazon Linux 2 이미지 ID를 리전별로 알아서 찾아옴
- 리소스 생성: 실제 EC2 서버를 만드는 부분
output.tf
output "private_ip" {
  value = aws_instance.default.private_ip
}
variable.tf
variable "instance_type" {
  description = "vm 인스턴스 타입 정의"
  default = "t3.micro"
}

variable "instance_name" {
  description = "vm 인스턴스 이름 정의"
  default = "my_ec2"
}
총정리
시나리오
- 서울/미국 멀티 리전 배포
- 랜덤 패스워드
- 동적 파일 생성
- 수명 주기 관리
terraform-master/
├── main.tf           # [루트] 메인 로직, 프로바이더, 모듈 호출, 반복문
├── variables.tf      # [루트] 입력 변수 및 검증(Validation)
├── outputs.tf        # [루트] 최종 결과 출력
└── modules/
    └── server/       # [자식 모듈] EC2, 수명 주기, 프로비저너
        ├── main.tf
        ├── variables.tf
        └── outputs.tf
루트 모듈
variables.tf
variable "env_name" {
  type    = string
  default = "dev"
}

variable "file_create" {
  type    = bool
  default = true
}

variable "content" {
  type    = string
  default = "Hello Terraform!"

  validation {
    # 1.9 버전 이상: 다른 변수(var.file_create) 참조 가능
    condition     = var.file_create == true ? length(var.content) > 0 : true
    error_message = "파일을 생성하려면 내용은 필수입니다."
  }
}

variable "user_names" {
  type    = list(string)
  default = ["alice", "bob"]
}
main.tf
# [Provider] 기본 및 별칭 설정
provider "aws" { region = "us-west-1" }
provider "aws" {
  alias  = "seoul"
  region = "ap-northeast-2"
}

# [Resource & Count] 1. 리소스 생성 및 인덱스 활용
resource "local_file" "user_logs" {
  count    = length(var.user_names)
  content  = "Log for ${var.user_names[count.index]}"
  filename = "${path.module}/log-${var.user_names[count.index]}.txt"
}

# [Data Source & Dependency] 2. 데이터 소스와 암시적 의존성
data "local_file" "read_log" {
  filename = local_file.user_logs[0].filename
}

# [Module & Provider Inheritance] 3. 자식 모듈 호출 및 프로바이더 전달
module "seoul_server" {
  source = "./modules/"
  providers = {
    aws = aws.seoul
  }
  instance_name = "seoul-master-node"
}

# [Dynamic Block] 4. 동적 블록 활용 (ZIP 아카이브)
data "archive_file" "bundle" {
  type        = "zip"
  output_path = "${path.module}/bundle.zip"

  dynamic "source" {
    for_each = var.user_names
    content {
      content  = "Welcome ${source.value}"
      filename = "${source.value}.txt"
    }
  }
}

# [For Expression] 5. 데이터 가공
locals {
  upper_names = { for name in var.user_names : name => upper(name) }
}
자식 모듈
main.tf
terraform {
  required_providers {
    aws = {
      source = "hashicorp/aws"
    }
  }
}

resource "aws_instance" "app" {
  ami           = "ami-0abcd123456789" # 예시 ID
  instance_type = "t3.micro"

  # [Lifecycle] 수명 주기 관리
  lifecycle {
    create_before_destroy = true

    # 생성 전 검증
    precondition {
      condition     = var.instance_name != ""
      error_message = "인스턴스 이름은 필수입니다."
    }

    # 생성 후 검증
    postcondition {
      condition     = self.public_dns != ""
      error_message = "퍼블릭 DNS가 할당되지 않았습니다."
    }
  }
}

variable "instance_name" { type = string }
output "instance_id" { value = aws_instance.app.id }
참고
테라폼으로 시작하는 IaC
'Study > Cloud' 카테고리의 다른 글
| [Cloud]Kubernetes - ResourceQuota, LimitRange (0) | 2024.07.19 |
|---|---|
| [Cloud]클라우드 보안 솔루션 (0) | 2024.07.13 |
| [Cloud]클라우드 워크로드 보안 플랫폼(CWPP) (0) | 2024.07.06 |
| [AWS]AWS Load Balancer Controller(ALB, NLB) (2) | 2023.11.22 |
| [AWS]EKS 샘플 애플리케이션 배포 (1) | 2023.10.29 |